Getting Started
Install AgentsInFlow, understand the workspace layout, and run your first AI agent in under 5 minutes.
AgentsInFlow is a desktop application for orchestrating AI coding agents — Claude Code, Codex, and Cursor — across your git projects. You bring your own AI subscription; AgentsInFlow gives your agents structure, memory, visibility, and coordination. Think of it as a project management layer that turns scattered terminal sessions into trackable, resumable, context-aware work.
What Is AgentsInFlow
Most developers using AI coding assistants run them in loose terminal sessions. Context is lost between runs, there is no history of what was tried, and coordinating multiple agents across branches is manual. AgentsInFlow solves this by sitting on top of your existing AI CLI subscriptions and providing:
You do not need to change your AI workflow. AgentsInFlow wraps whatever CLI you already use and adds the structure around it. The screenshot below shows the assistant chat view with conversation history.
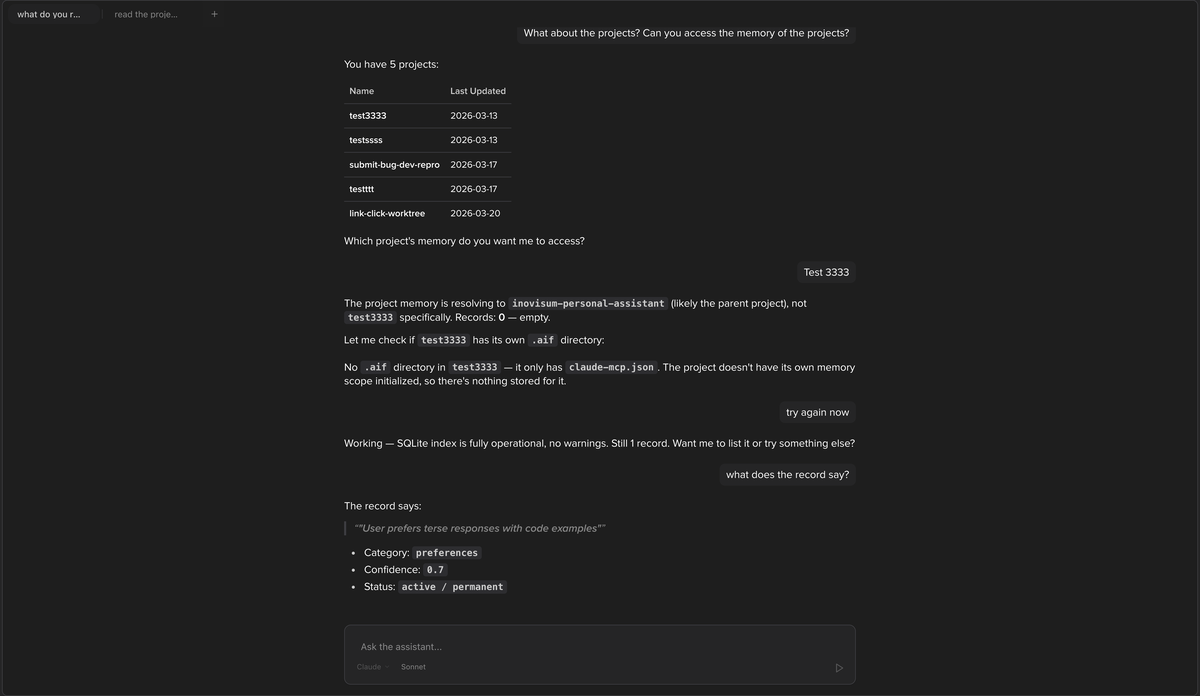
- The Assistant view provides a full-screen chat interface for interacting with AI agents.
- Conversations are persisted across sessions and can be organized into folders in the sidebar.
- The engine and model selector at the bottom lets you switch between Claude, Codex, and Cursor mid-conversation.
Installation
System Requirements
| Requirement | Details |
|---|---|
| Operating system | macOS 12+, Windows 10+, Linux (Ubuntu 20.04+, Fedora 36+) |
| RAM | 4 GB minimum, 8 GB recommended |
| Disk space | ~300 MB for the application |
| AI CLI | At least one of: Claude Code, Codex, or Cursor (installed and authenticated) |
| Git | Git 2.30+ installed and available on PATH |
Download and Install
Download the latest release for your platform from GitHub Releases.
macOS — Open the .dmg, drag AgentsInFlow to Applications. On first run, right-click and select Open to bypass Gatekeeper.
Windows — Run the .exe installer. If SmartScreen appears, click More info then Run anyway.
Linux — Install the .AppImage or .deb package. For AppImage, run chmod +x first.
Authenticate Your AI CLI
AgentsInFlow does not manage AI credentials directly — it delegates to the CLI you have installed. Before running your first ticket, make sure at least one CLI is authenticated:
Claude Code
Anthropicnpm install -g @anthropic-ai/claude-code
claude login
Tip: If the app does not detect your CLI, make sure it is installed globally (npm list -g) and that your shell PATH includes the install location.
The Workspace Layout
AgentsInFlow’s interface is organized into three main regions that work together to give you visibility into every layer of your project.
Sidebar
The Sidebar occupies the left edge of the window (280px default width). It contains:
Cmd+G / Ctrl+G) and New Terminal (Cmd+T / Ctrl+T). Hold Shift to bypass the dialog and create directly.In collapsed mode, the sidebar shows project icons with color-coded badges. Each icon represents a project you can switch to with a single click.

Content Area
The Content Area fills the center of the window and displays whatever view mode you are in — workspace tabs, kanban board, dashboard, git history, activity log, or the full assistant chat.
Inspector Panel
When you open a ticket in Workspace mode, the content area splits into two resizable panels:
| Panel | Min Width | Contains |
|---|---|---|
| Left (Ticket Details) | 320px | Title, description, notes, dependencies, child tickets |
| Right (Execution) | 640px | Attempt tabs, execution config bar, live terminal output, git drawer |
The left panel shows the ticket description and metadata. Below is the ticket details panel for a running execution.

- The ticket title and type badge appear at the top.
- The markdown description fills the body of the panel.
- Tabs for Children and Depends On let you manage ticket relationships.
The right panel displays the execution terminal. Below is a running agent session with the config bar and live output.
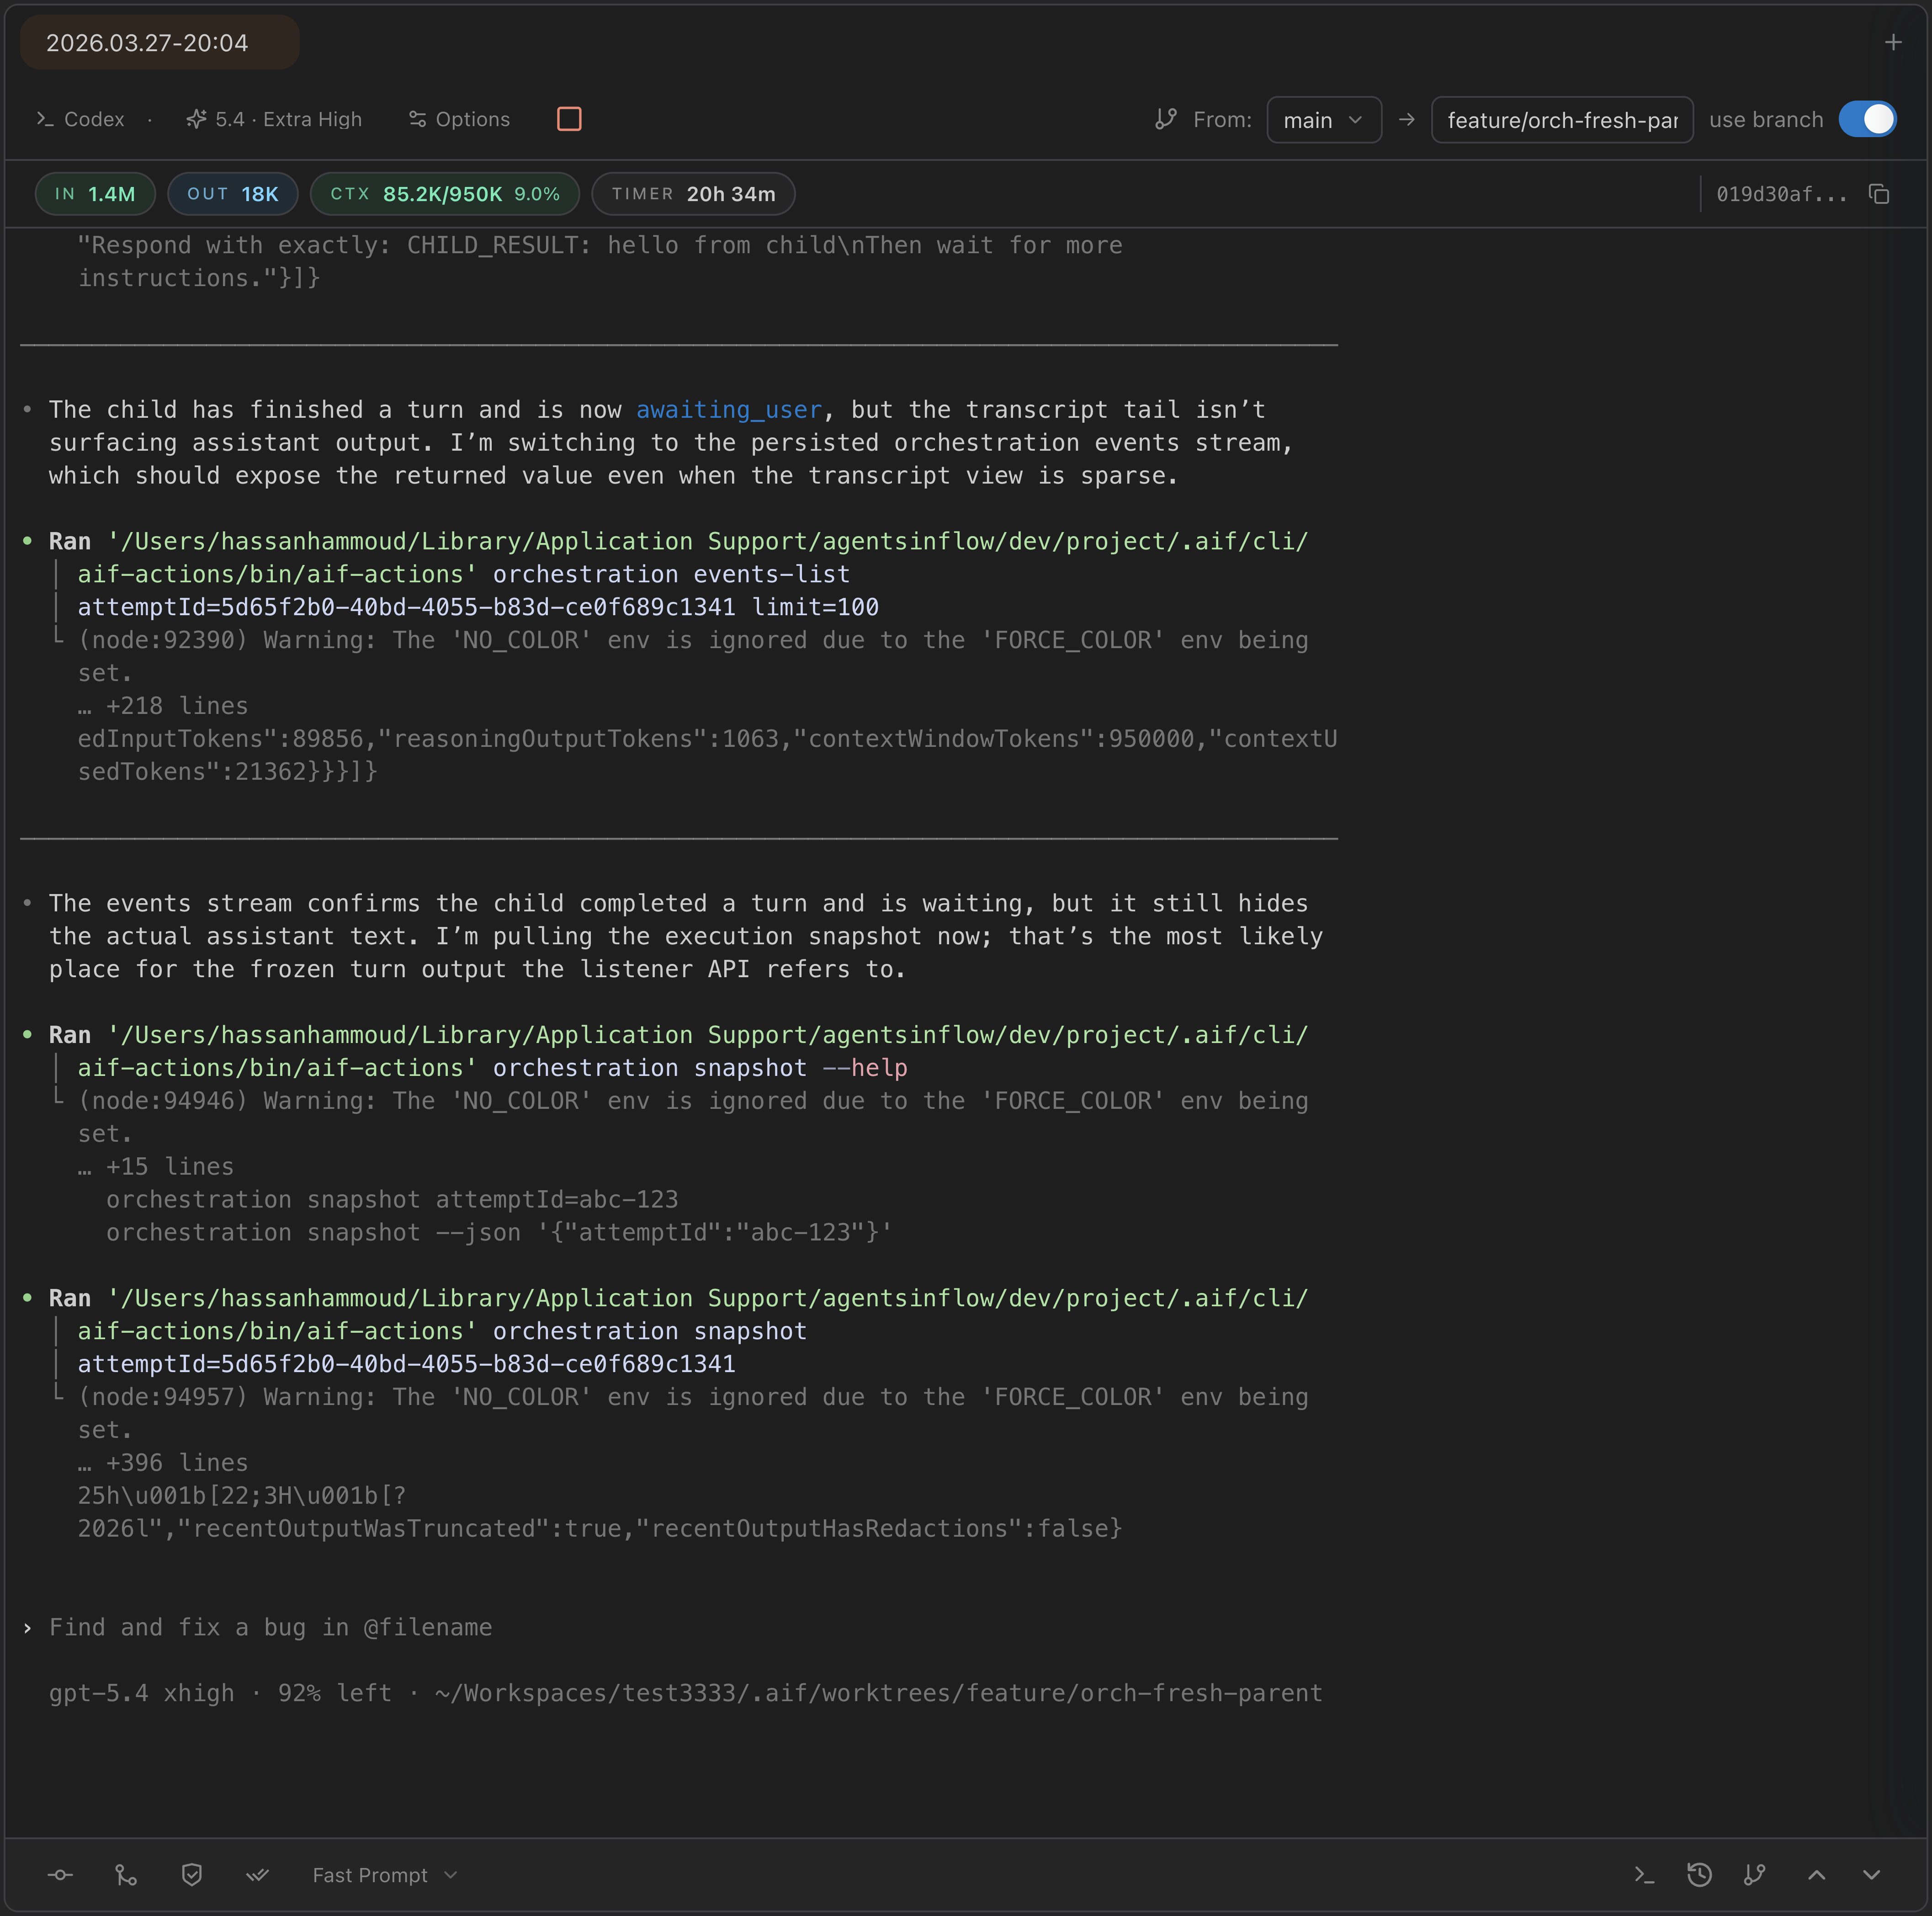
- The config bar at the top shows the engine, model, branching options, and live token metrics.
- The terminal below streams agent actions in real time.
- Buttons for Stop, Commit, Merge, and Mark as Done appear in the bar.
Drag the divider between panels to resize. The split persists across sessions.
Tip: You can collapse the sidebar to maximize your content area. The sidebar, content, and inspector panel widths are all adjustable.
Navigation Modes
AgentsInFlow has six view modes, each accessible via keyboard shortcut or the ViewModeSwitcher buttons at the top of the sidebar.
| Mode | Mac | Win / Linux | What It Shows |
|---|---|---|---|
| Assistant | Cmd+1 | Ctrl+1 | Full-screen AI chat with conversation history and folders |
| Dashboard | Cmd+2 | Ctrl+2 | Widget grid with charts, diagrams, and markdown panels |
| Kanban | Cmd+3 | Ctrl+3 | Ticket board organized by status columns |
| Workspace | Cmd+4 | Ctrl+4 | Tab-based editing with tickets, files, and terminals |
| Git | Cmd+5 | Ctrl+5 | Branch visualization, commit history, and diff viewer |
| Activity | Cmd+6 | Ctrl+6 | Unified event log of all agent and system actions |
The view mode buttons are always visible at the top of the window. The active mode is highlighted with the project’s accent color.

- Each button shows an icon and label for the mode.
- The active mode (here Workspace) is highlighted with the project accent color.
- Click any button or use the keyboard shortcut (
Cmd+1throughCmd+6) to switch.
The Kanban view organizes tickets into columns by status, giving you a board-level view of work across your project.
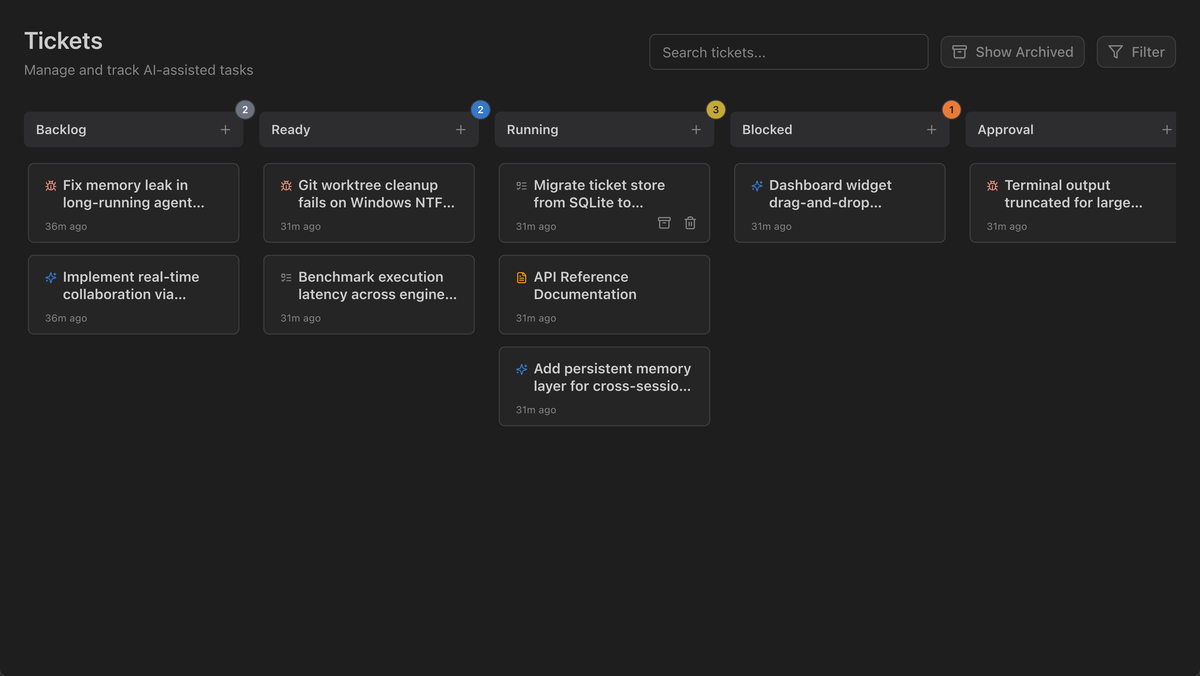
- Tickets are grouped into Backlog, Ready, Running, Blocked, Approval, and Done columns.
- Each ticket card shows its type badge, title, and creation date.
- The Active Agents panel on the right shows currently running executions across projects.
The Activity view provides a unified event log of all agent and system actions across your project.
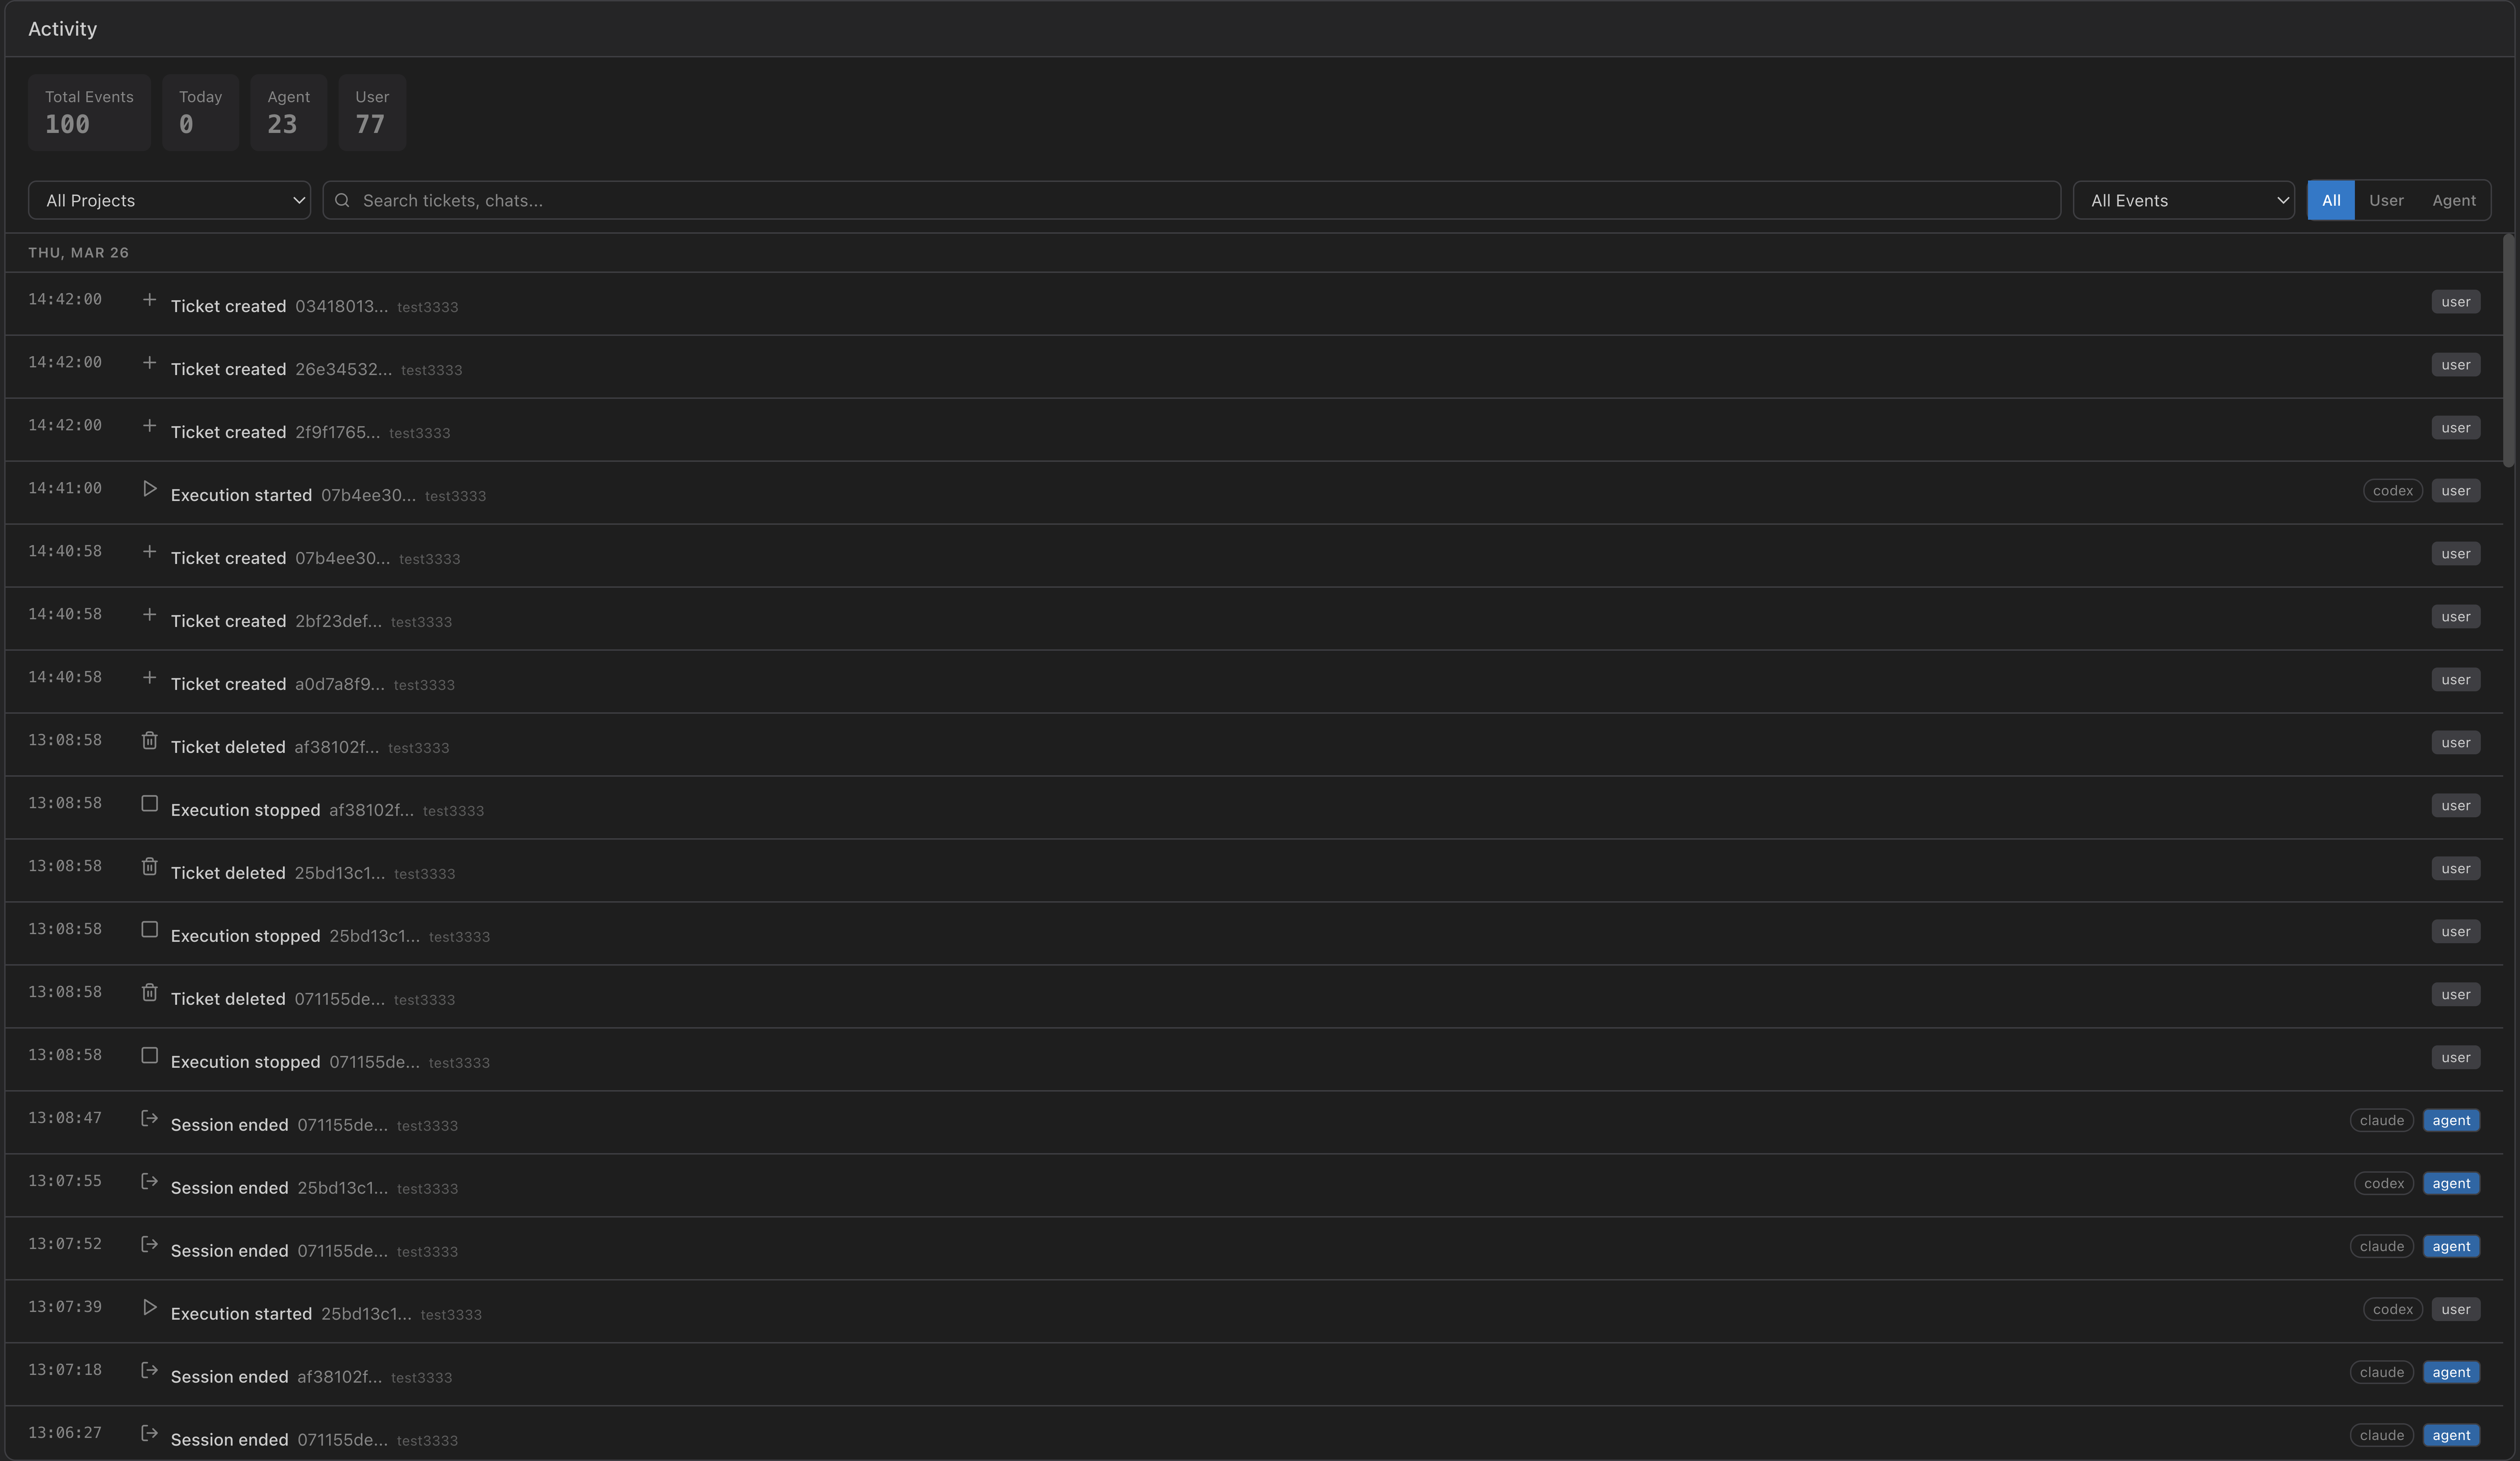
- Events are listed chronologically with timestamps, source type (user, agent, system), and descriptions.
- Filter by event source to isolate agent actions from user actions.
Note: The Assistant can also be opened as a floating window that stays on top of other views — see Assistant Workflows for details on inline vs. detached mode.
Three Layers of Work
AgentsInFlow organizes work into three layers. Understanding this mental model helps you use the right tool at the right time.
| Layer | Storage | Best For | Formality |
|---|---|---|---|
| Chat | Conversation history, folders | Exploration, brainstorming, quick questions | Low |
| Tickets | Database, typed, dependency-linked | Trackable work, agent-executable tasks | Medium |
| Files | On-disk markdown and code | Knowledge base, documentation, long-form content | High |
How Work Flows Between Layers
The typical progression is: conversation → ticket → execution → files.
The Dashboard view lets you create custom status boards to visualize your project. It sits alongside the three work layers as a monitoring surface.
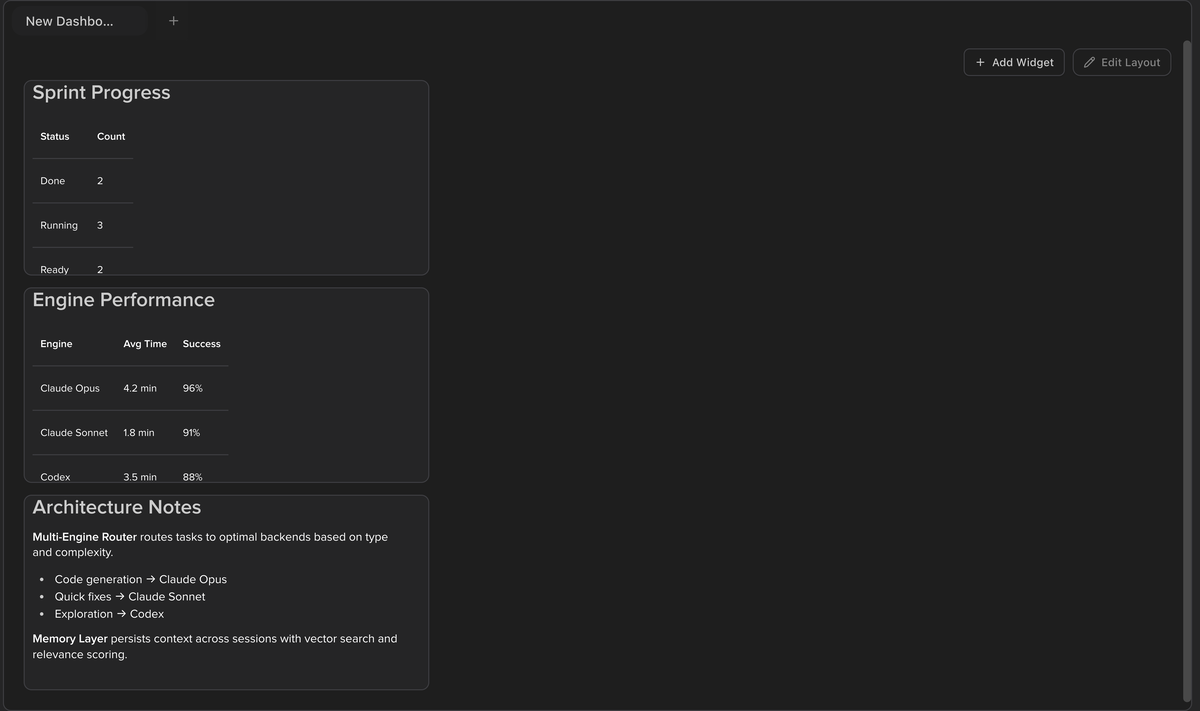
- Dashboards use a 12-column grid where you place chart widgets (ECharts), diagram widgets, and markdown panels.
- The Active Agents panel on the right shows all currently running executions with their status and duration.
Not every conversation needs to become a ticket, and not every ticket needs agent execution. Use the layer that matches the formality of your work.
Tip: Start in chat. When work becomes actionable, create a ticket. The agent writes the files.
Your First Workflow
Follow these steps to go from a fresh install to a completed AI-driven task.
1Create a Project
Click the + button in the sidebar or use the Command Center (Shift+Shift) and search for “new project.” Select a local git repository to associate with the project. In the dialog you can name the project, choose an accent color, and set the default AI engine and model.
2Create a Ticket
Click New Ticket in the sidebar or press Cmd+G / Ctrl+G. The ticket composer opens with fields for Title, Type (bug, feature, task, document, agent), Priority, and a markdown Description. Write a clear description — the AI agent reads it as its primary instruction.
3Configure the Engine
The Execution Config Bar appears at the top of the right panel when you open a ticket. Select your Engine (Claude, Codex, or Cursor), Model, and adjust CLI Options including permission mode, approval policy, sandbox settings, and MCP server selection. For Claude, you can also set the Reasoning Effort level. The config bar inherits defaults from your project settings — override any value per-execution.
4Run the Ticket
Click the Play button (triangle icon) to start the agent. Use Fast Forward to execute the ticket description immediately without a deferred prompt. Play opens the terminal and waits for an optional prompt; Fast Forward submits the ticket description and starts immediately.
5Watch It Work
The right panel shows live terminal output as the agent works. The execution config bar updates in real time with metrics:
Context usage is color-coded: green under 50%, amber 50–80%, red above 80%. You can Stop the execution at any time, or let it run to completion.
The execution config bar displays live metrics while the agent runs. Below is the config bar from an active Codex execution.

- The top row shows the attempt timestamp. The middle row has the Engine (Codex), Model (5.4 Extra High), Options, and branch config (from: main, use branch toggle).
- The bottom row shows live metrics: IN (input tokens), OUT (output tokens), CTX (context usage at 9.0%), TIMER, and session ID.
6Review the Result
When the agent finishes, switch to the Git view (Cmd+5 / Ctrl+5) to see all changes. Browse diffs, review commits, and accept or reject changes before pushing. Each execution creates an attempt — a discrete run with its own terminal output, git changes, and status. You can run multiple attempts per ticket with different engines or models and compare results.
Warning: Make sure your AI CLI (Claude Code, Codex, or Cursor) is installed and authenticated before running your first ticket. AgentsInFlow will show an error if the selected engine’s CLI is not found on your system PATH.
Key Shortcuts Reference
These shortcuts work globally across all view modes.
| Action | Mac | Windows / Linux |
|---|---|---|
| Switch to Assistant | Cmd+1 | Ctrl+1 |
| Switch to Dashboard | Cmd+2 | Ctrl+2 |
| Switch to Kanban | Cmd+3 | Ctrl+3 |
| Switch to Workspace | Cmd+4 | Ctrl+4 |
| Switch to Git | Cmd+5 | Ctrl+5 |
| Switch to Activity | Cmd+6 | Ctrl+6 |
| Open Command Center | Shift+Shift | Shift+Shift |
| New Ticket dialog | Cmd+G | Ctrl+G |
| New Ticket (direct) | Cmd+Shift+G | Ctrl+Shift+G |
| New Terminal dialog | Cmd+T | Ctrl+T |
| New Terminal (direct) | Cmd+Shift+T | Ctrl+Shift+T |
| Save active editor | Cmd+S | Ctrl+S |
| Find in file | Cmd+F | Ctrl+F |
| Replace in file | Cmd+R | Ctrl+R |
| Toggle transcription | Cmd+Alt+R | Ctrl+Alt+R |
For the complete shortcut reference and customization options, see Keyboard Shortcuts.
Next Steps
Now that you have the fundamentals, explore the features that matter most to your workflow: